The sixth step is a bit more complicated than the previous ones: Use keywords to sort your images.
I often see photographers sort their images by creating separate folders based on the subject of the photograph. For example, I was recently helping a someone organize a chaotic mess of 100,000 image files. This photographer, instead of organizing the images chronologically, organized them by subject with each subject in a different folder. There was a folder for birds as well as one for eagles, hawks, and backyard birds; there was a folder for family as well as separate folders for each member of the family; there was a folder for vacations as well as folders for many states. And, there were duplicates galore because, if an image was of the photographer’s teenage son, a copy went into the folder for family pictures and into the folder named for the son. It was a mess!
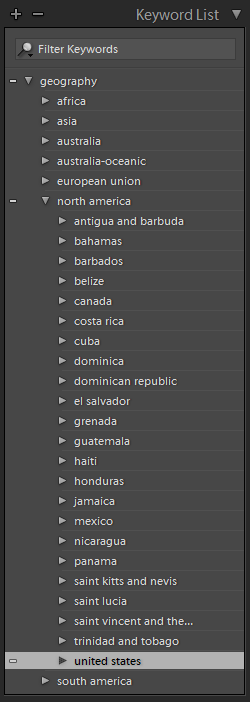
Screenshot 1: The Keyword List panel in Lightroom is the starting point for assigning keywords. From this panel, you can create, edit, or delete keywords, assign keywords to an image or images, and rearrange the hierarchy of keywords, and search for images with a specific keyword.
While I remain committed to the idea that you can choose any system of folder and file naming that works for you, this type of organization works for no one. Why? Because you can’t keep track of your images this way. Which image of the multitude of duplicates is your master image? If you make a habit of only adding each image to one folder, how do you know whether the image you are looking for is not in a different folder? If you dump all your images from New Mexico into a single folder, what happens when you want to look at the images from New Mexico from the trip in 2012?
In the third posting in this series, I recommended that you store your photographs by date regardless of the subject and, now to help you find all your images in those chronologically arranged folders, I recommend that you tag your images with keywords.
You don’t need to add 20 keywords to each image; you only need enough keywords to differentiate images. For example, an image of me hiking in Muir Woods in northern California could be tagged with “Brian,” “Muir Woods,” “California,” “Mill Valley,” “vacation,” “coastal redwoods,” “Douglas fir,” “afternoon,” “green,” “hiking,” and “photography.” However, I can really limit the keywords to brian, muir woods, mill valley, coastal redwoods. Why? Because these are the keywords that I am most likely to search for when looking for images. So, you can see that which keywords you assign is really somewhat dependent on what it is you are doing with your images.
Lightroom provides a variety of ways to create, edit, delete, and assign keywords. However, here are some things to keep in mind when you implement keywords…
- Keep in mind that you can and should create a hierarchy of keywords, e.g., geography > north america > united states > california > Mills Valley. The reason for the hierarchy is that, if you assign “Mills Valley” to an image, Lightroom will also assign all the keywords higher in the hierarchy to the image as well, i.e., geography, north america, united states, and california to the image. You can then search all your images for “california” and Lightroom will display any images tagged with “mills valley” as well as other cities under “california.”
- Set up at least a small list of keywords before you begin assigning keywords. It doesn’t need to be a complete list at this point because you can add more keywords as you are adding keywords to images. However, it is helpful to have a basic structure. For example, for locations you might create a set of keywords as follows: geography > north america > united states > virginia and then add cities under virginia as they are needed for keywording.
- Use the plural form of words, e.g., caterpillars rather than caterpillar. Because if you search for the singular, Lightroom will find images assigned “caterpillars” but, if you search for the plural, Lightroom will not find images assigned “caterpillar.”
- Create keywords using the words that you would use. For example, use woodpecker instead of Picidae, the scientific name for woodpeckers.
- Check your spelling.
- Always verify the keyword or a similar one isn’t already in the keyword list. You don’t want multiple keys for the same subject, e.g., bears and coastal brown bears. Use one and stick with that keyword.
- Use capitalization consistently for readability. It doesn’t matter whether proper nouns are capitalized; Lightroom ignores capitalization.

Screenshot 2: Click on the + (plus) sign to display the Create Keyword Tag window. Create a keyword by entering the name of the keyword and any synonyms, checking the desired options, and clicking on Create.
To add a keyword to the keyword list…
- Open the Keyword List panel
- Click on the + (plus) sign on the far left side of the panel’s title bar (see screenshot 2)
- Complete the Keyword Tag by entering a name for the keyword, any synonyms, and checking the desired options (Generally, the first three options should be checked and whether the last two are checked depend on the circumstances.) (see screenshot 2)
- Click on the Create button
To create a hierarchy of keywords…
- Highlight the containing keyword, e.g., if you create the keyword virginia and want to create the keyword richmond under virginia, highlight virginia by clicking on it once in the keyword list
- Click on the + (plus) sign on the far left side of the panel’s title bar (see screenshot 2)
- Complete the Keyword Tag by entering a name for the keyword, any synonyms, and checking the desired options (see screenshot 2)
- Check “Put inside [keyword], e.g., virginia in the above example (see screenshot 2)
- Click on the Create button
If the keyword ends up in the wrong place in the heirarchy, simply drag and drop it to the correct location. Lightroom will handle all the mechanics and any images assigned the keyword will be updated automatically.
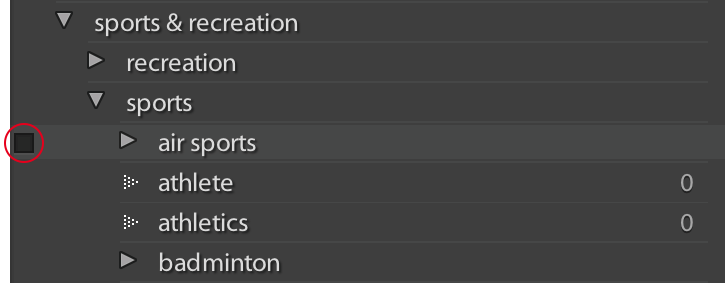
Screenshot 3: When the cursor is rolled over “air sports,” a small checkbook appears to the far left of the keyword. Click the box to assign the keyword.
To add a keyword to an image or images…
- Go to Grid View
- Select an image or images
- Find the keyword in the Keyword List panel
- Roll the cursor over the keyword and click on the small checkbox that appears to the far left of the keyword (see screenshot 3)
One final suggestion, add keywords to your images before you start processing the. If you don’t, you will never add them and really just a few keywords will make finding your images much easier.
– Brian
Editor’s Note: In early May, Brian started a series of ten posts each outlining one or more simple but small things you can do to speed up your Lightroom workflow. This is the sixth post in that series; the first post was about how to efficiently manipulate Lightroom’s interface to reduce clutter; the second about the improving your efficiency inside Lightroom by using context menus; the third about how to name folders; the fourth about how to name image files; and the fifth about using keyboard shortcuts.
